GitOps with Portainer: Real-World Use Cases and Worked Examples
Key takeaways
Key Benefits:
- Environment Isolation: Separate Git branches for each environment prevent untested changes from reaching production.
- Automation: Portainer automates deployment to the correct environment based on Git branch updates.
Portainer’s GitOps support provides a powerful way to manage and automate application deployments across Kubernetes environments. By using Git as the source of truth you can ensure consistency, reliability, and traceability in your deployment processes. Whether you need automated updates, easy rollbacks, or multi-environment management, GitOps with Portainer offers a flexible and scalable solution for your Kubernetes workloads.
Portainer is a powerful tool that simplifies managing containerized applications, and with its built-in GitOps capabilities, deploying and managing applications from Git repositories becomes a seamless experience. In this post we’ll walk through how to configure GitOps in Portainer by creating applications from Kubernetes manifests stored in Git, with real-world examples and practical use cases.
What is GitOps?
GitOps is a modern way of managing and automating deployments by treating Git as the source of truth for infrastructure and application configurations. With GitOps, all changes are made in a Git repository, and a GitOps tool like Portainer ensures that the live environment matches the desired state defined in Git. This offers benefits like traceability, version control, and automated rollbacks.
Setting Up GitOps in Portainer
In Portainer, you set up GitOps when creating a new application from a manifest stored in a Git repository. There’s no need to “enable” GitOps separately—it’s natively supported as part of the codified application deployment process.
Prerequisites:
- A running Kubernetes cluster
- Portainer Business Edition installed and configured
- A Git repository containing Kubernetes manifests or Helm charts
Step 1: Navigate to Applications and "Create from Code"
- Log in to Portainer and select your Kubernetes environment.
- Navigate to the Applications section.
- Click Create from Code to start the process of deploying an application using a manifest stored in a Git repository.
Step 2: Configure GitOps with the Manifest
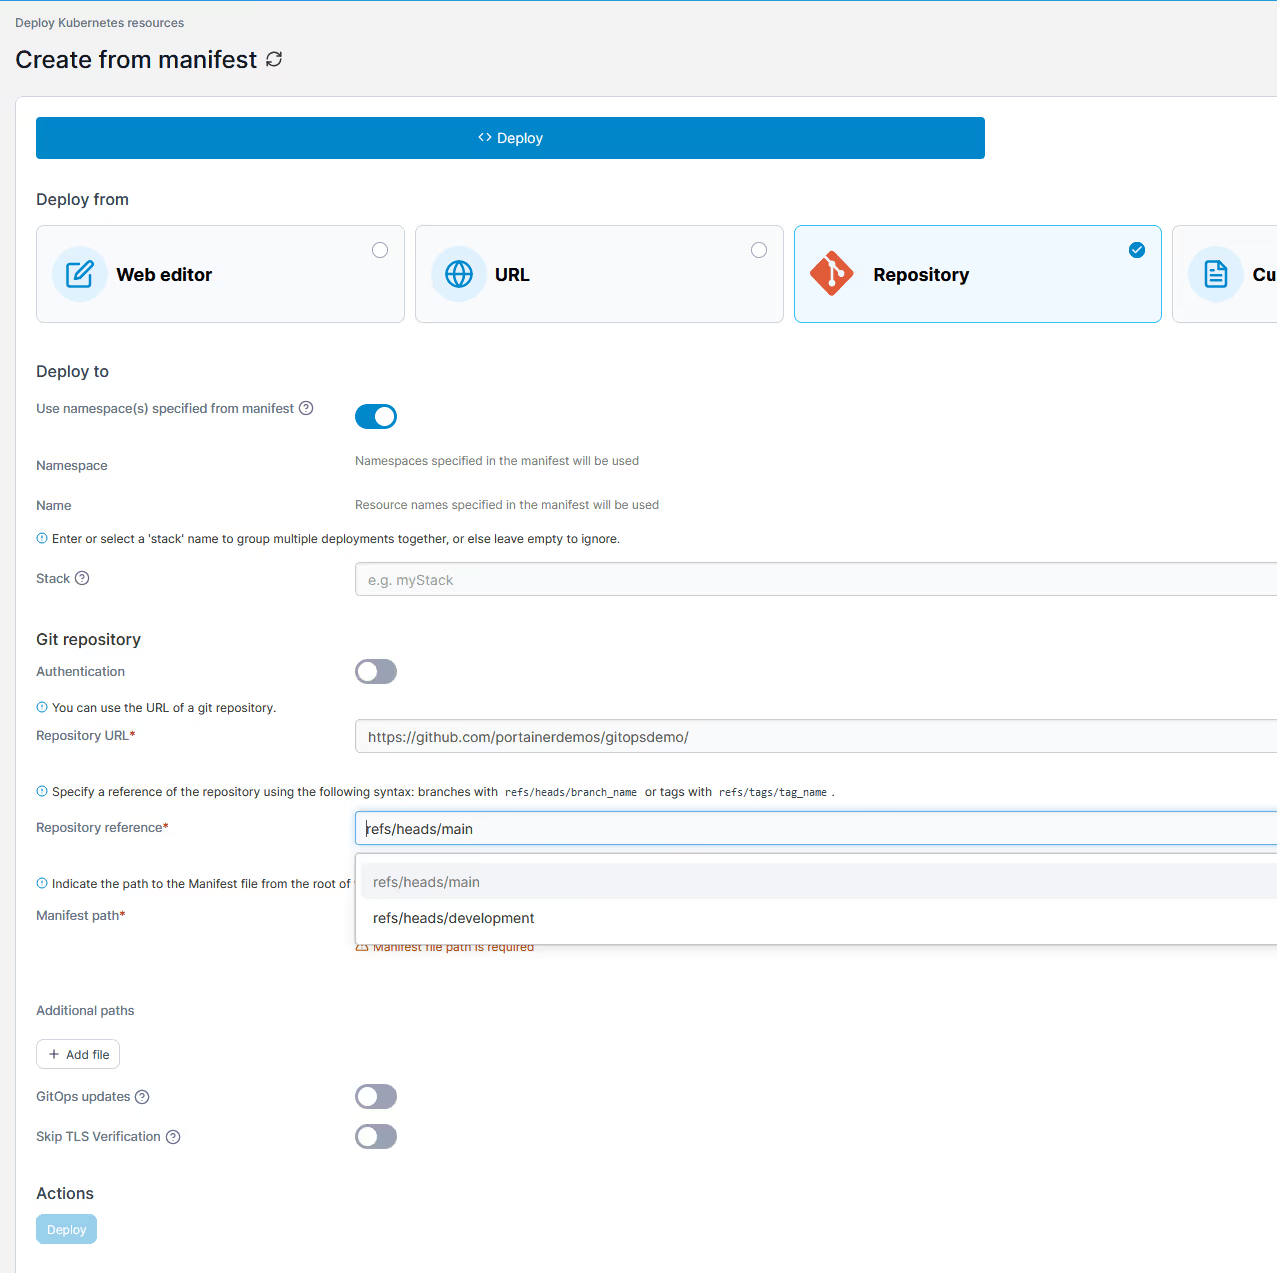
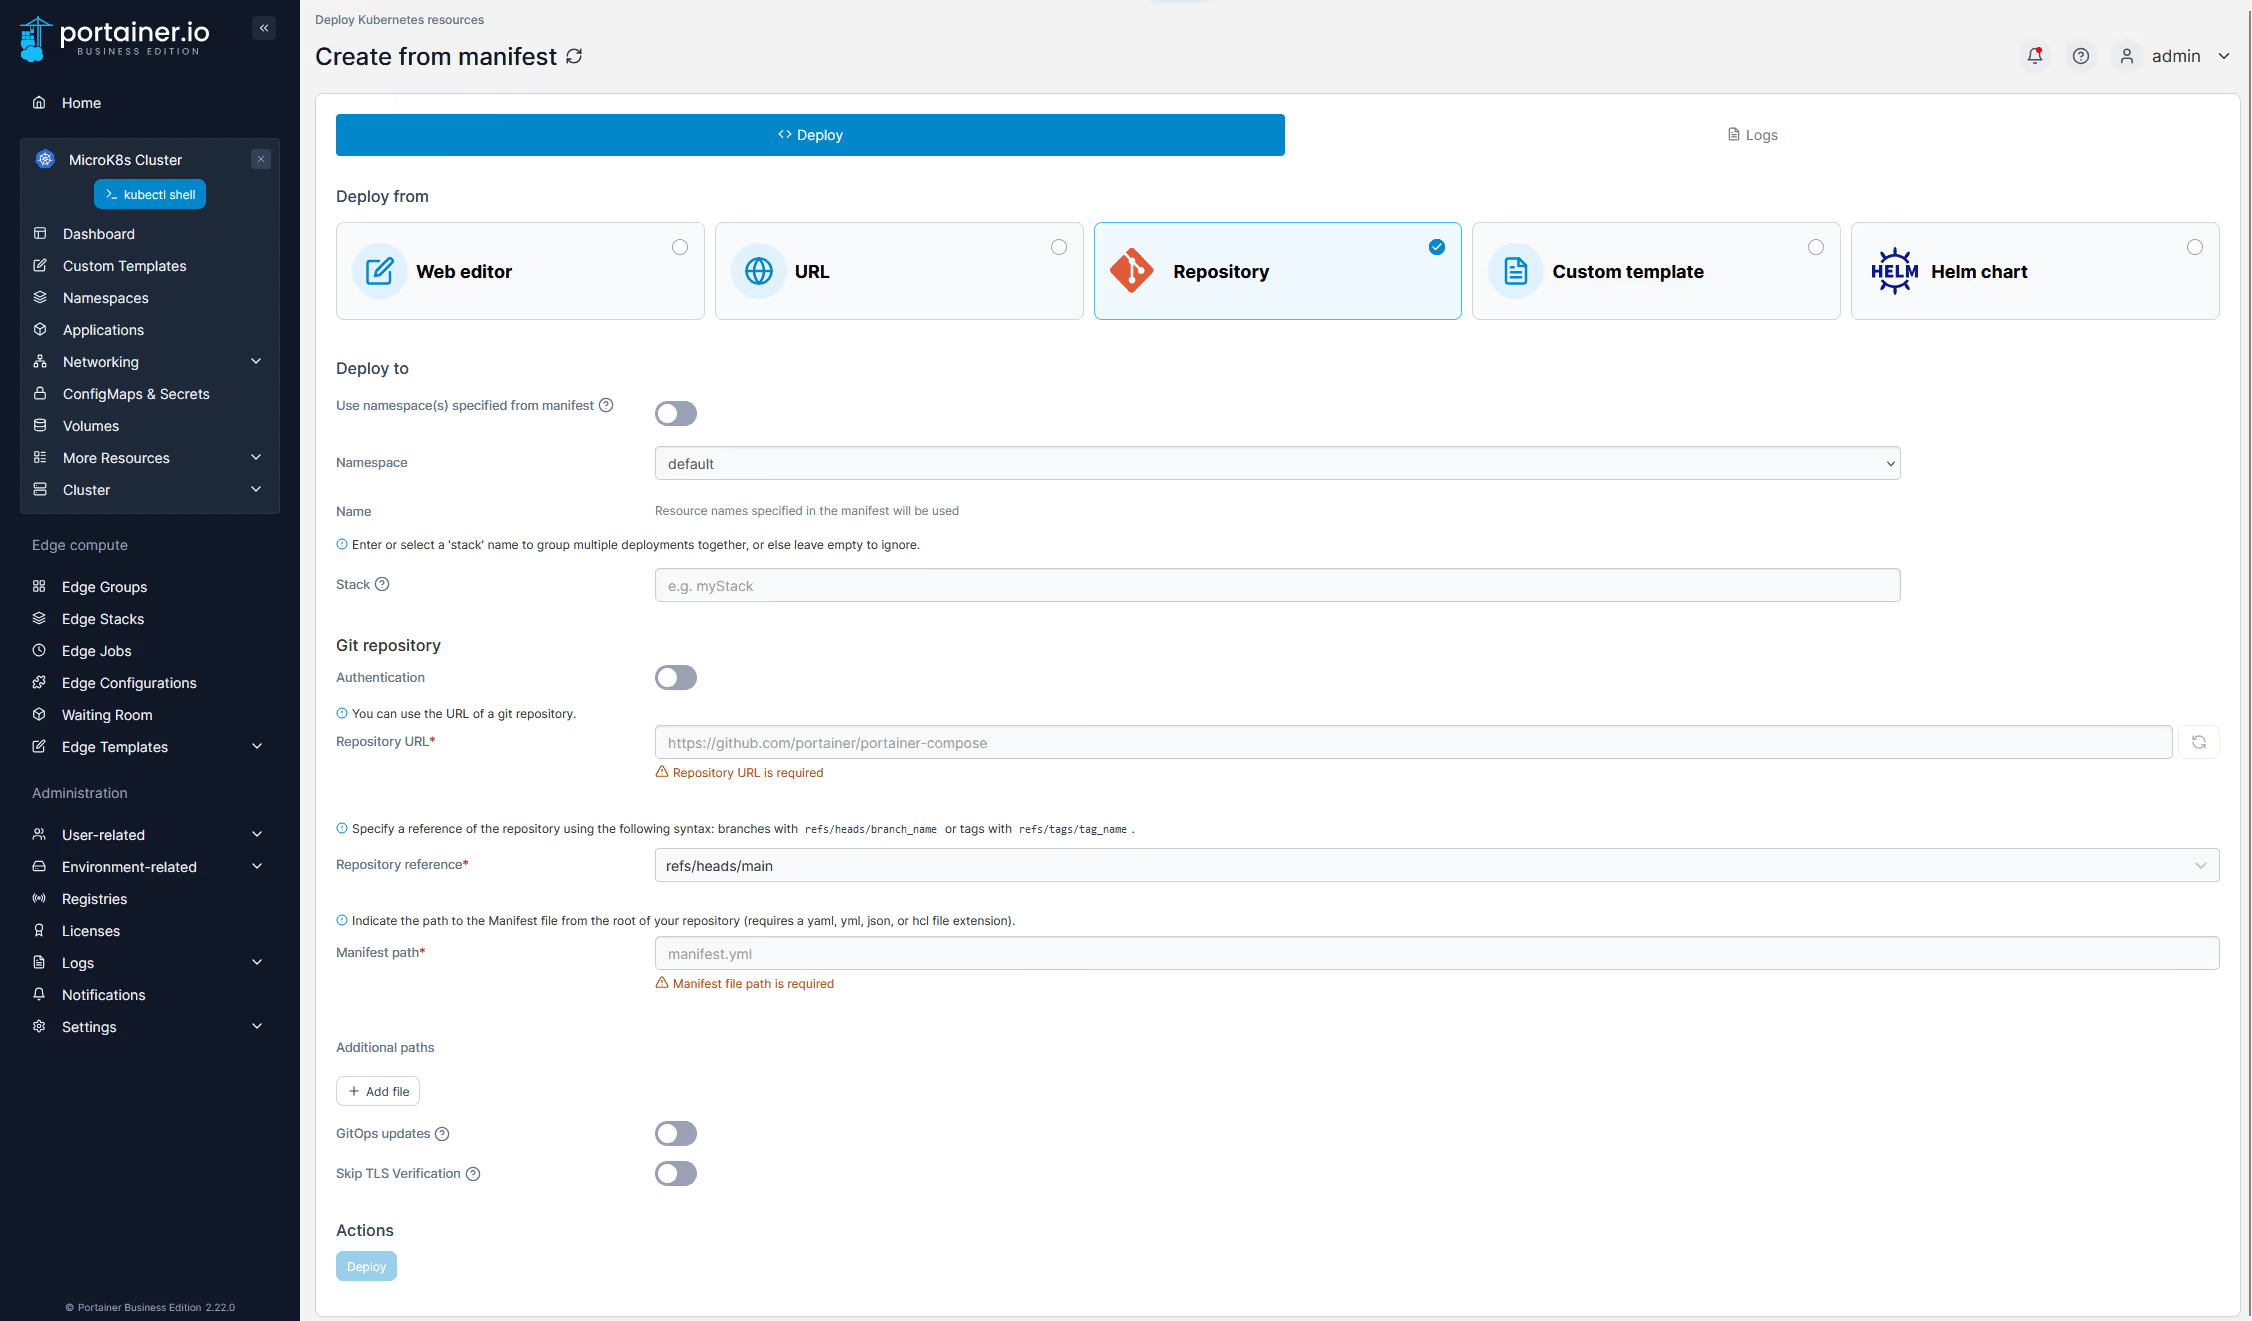
When prompted, you will need to configure the connection to your Git repository:
- Namespace: Decide if you want to use the namespace specified in your manifest, or to override and manually select a target namespace
- Authentication: If your Git Repo requires authentication, add the credentials
- Repository URL: Enter the Git URL where your Kubernetes manifests are stored (e.g., GitHub, GitLab).
- Repository Reference: Specify the Git branch from which you want to deploy (commonly
mainormaster). - Manifest Path: Provide the path within the repository where the manifest is located (e.g.,
/manifests/deployment.yaml). You can add as many manifest paths as you need for your application.
Here’s an example of a basic deployment.yaml:
apiVersion: apps/v1kind: Deploymentmetadata: name: sample-appspec: replicas: 2 selector: matchLabels: app: sample-app template: metadata: labels: app: sample-app spec: containers: - name: sample-app image: nginx:1.17 ports: - containerPort: 80Once you've configured the connection to your repository, Portainer will fetch and apply the manifests to your Kubernetes environment.
Step 3: Set Up GitOps Automatic Sync
During the setup, you can configure Portainer to sync with the Git repository automatically. This ensures that changes pushed to the repository (e.g., new image versions or configuration updates) are automatically applied to your Kubernetes cluster.
- GitOps Updates: Select to enable the GitOps reconciliation engine
- Mechanism: You can enable Polling (default) or Webhook if you prefer push-based updates
- Fetch Interval: You can configure how often Portainer checks for updates in your Git repository (e.g., every 5 minutes).
- Always Apply Manifest: This option ensures that any local changes made live within the cluster are always overwritten, even if there are no changes in the Git repo.
- Skip TLS verification: If you are using self-signed certs on your Git repo, you can disable TLS warnings

Real-World Scenario 1: Updating Applications Automatically with GitOps
Let’s say you manage a containerized web service deployed via GitOps in Portainer. The application is a basic Nginx web server.
Workflow Example:
The team updates the Docker image version in the deployment.yaml from nginx:1.17 to nginx:1.18.containers:- name: sample-app image: nginx:1.18
They then push the updated manifest is pushed to the main branch of your Git repository.
Portainer’s GitOps feature detects the change (based on the sync interval you configured) and automatically redeploys the updated application to Kubernetes, switching to the new nginx image version.
Key Benefits:
- Automation: No need for manual updates, ensuring applications always match the latest configuration in Git.
- Consistency: The live environment always reflects the desired state as defined in Git.
Real-World Scenario 2: Rollbacks with GitOps
GitOps in Portainer also simplifies rollbacks, helping teams quickly revert to a previous known good state if something goes wrong during an update.
Workflow Example:
After deploying nginx:1.18, you discover that the new version has introduced a bug.
To roll back, you simply revert the change in the Git repository to the previous nginx:1.17 version:
containers:- name: sample-app image: nginx:1.17 # Revert to previous version
Then push the change to the Git repository.
Portainer automatically detects the update and redeploys the previous working version (nginx:1.17) to Kubernetes, effectively rolling back the change.
Key Benefits:
- Easy Rollback: Simply revert the change in Git and let Portainer handle the redeployment.
- Version Control: Since every change is recorded in Git, you have a complete audit trail of all deployments.
Real-World Scenario 3: Multi-Environment GitOps Deployment
If you manage multiple environments, such as development, staging, and production, you can use GitOps with Portainer to manage deployments across all environments in a consistent and controlled manner.
Workflow Example:
Each environment (development, staging, production) is linked to a different branch in your Git repository.
- Development:
devbranch - Staging:
stagingbranch - Production:
mainbranch
Developers push changes to the dev branch, and once tested, they merge changes to the staging branch for further validation.
Finally, once the changes are validated, the code is merged to the main branch, which Portainer automatically deploys to the production Kubernetes cluster.
Key Benefits:
- Environment Isolation: Separate Git branches for each environment prevent untested changes from reaching production.
- Automation: Portainer automates deployment to the correct environment based on Git branch updates.
Portainer’s GitOps support provides a powerful way to manage and automate application deployments across Kubernetes environments. By using Git as the source of truth you can ensure consistency, reliability, and traceability in your deployment processes. Whether you need automated updates, easy rollbacks, or multi-environment management, GitOps with Portainer offers a flexible and scalable solution for your Kubernetes workloads.
One platform, not twelve tools.
Govern Kubernetes across your whole fleet from a single control plane. Get 3 nodes free.
Get 3 nodes freeTalk to technical sales